
mechanical advantage system
- Alex Dubreuil

- Mar 12
- 25 min read
Firstly, this text does not represent the ideas of the CSRQ (Quebec River Safety Consortium). It is a personal written exercise.
This resource is not a substitute for whitewater rescue training provided by a recognized training provider.
My goal here is to assemble information from several sources and try to rephrase it into simple basic principles that I could explain to a child.
Table of Contents:
Mechanical Advantage System (MAS): What is it?
General ideas about SAMs
The 4-3-2-1-1 rule
Equipment
Security
The different SAMs
Knots
Anchorages
Vertical rescue vs. horizontal rescue
How much weight will I need to pull to get my boat out?
The rule of 12
The T-count method
Turning line
Taco Method
Diagonal under tension (zip-line)
The shooting sequence
Personal conclusion
Sources
Mechanical Advantage System (MAS): What is it?
A mechanical advantage system (MAS) is a rope system to pull a boat stuck in the river or to help people and equipment cross the river.
In other words, it involves using equipment such as ropes and pulleys to amplify the force on a load or to tension a rope between two anchors.
Setting up a SAM takes time, so it is rarely used/feasible when the situation is urgent.
The best way to learn how to do SAMs is to practice, in person (during training), on land and then during scenarios, on the river.
General ideas about SAMs
Keep it simple . SRS: Safety. Speed. Simplicity
Preparation : The best rescue is the one you don't have to make. Your brain, what you've learned and what you've practiced, is your most valuable asset.
Attitude : We are all here to have fun, develop skills, and feel accomplished. The goal is always to return home healthy.
Risks : Risks are always present in whitewater. The idea is to anticipate, prepare, discuss your risk tolerance, and have a plan.
River's power : In any situation, use the river's power to your advantage. Work with the current, not against it.
Assess the scene : Is the scene safe? Currents, rapids, obstacles, accessibility, etc. Go slowly to go fast!
Leader : The leader maintains an overview of the situation and assesses the risk. He deploys one or more spotters upstream (for possible debris or to inform other paddlers of the ongoing situation) and downstream (to assist a victim who may have "fallen out" during the operation, ideally with a boat).
Plan : Define roles and communication (signs to use). Normally, when we're working on a SAM (Single Action Map), time is no longer a critical factor (no rush to gather materials). Maintain a flexible approach. Have a plan B, C, etc. Sometimes, several strategies need to be tested before finding the right solution. Identify weaknesses.
Construction : Ideally, always perform a double check after building your SAM (secure anchoring? Safe scene and rescuers?). Take your time and be efficient. Simplicity is key; the more complex the system, the more components that can break.
Pulleys : A mechanically advantageous pulley should not be confused with a directional pulley, which offers no mechanical advantage. A quick and easy rule to distinguish between the two is this: if the pulley moves, it provides a mechanical advantage; if it does not move, it is directional.
Strength : We should stick to less than 50% of the breaking strength of the weakest element in our SAM. Approaching the theoretical strength limits can damage equipment and injure rescuers.
The 4-3-2-1-1 rule

A concept to remember the equipment needed to build a basic SAM. Every paddler should have at least the 4-3-2-1-1 (minimum equipment to build a 3:1 SAM).
4 carabiners
3 pulleys
2 prusiks
1 strap
1 rope (rope bag)
Unlike rescue specialists, paddlers need to take a more minimalist approach, as too much equipment can be detrimental by adding unnecessary weight to the boat.
An interesting video on the subject: https://www.youtube.com/watch?v=AxUGdW-PSuY&t=1s
Equipment
As we have just seen, the basic equipment for creating a mechanical advantage system is:
Carabiner
Pulley
Prusik
Strap
Rope
Carabiner
Locking Carabiners: In whitewater, safety is critical, and a carabiner poses a danger on the river because it can connect things that shouldn't be connected (e.g., you and your kayak). This is why we should only use locking carabiners (with a built-in safety mechanism that prevents the carabiner from accidentally opening). Non-locking carabiners (standard/spring-loaded) should have no place in whitewater. I encourage you to eliminate all non-locking carabiners from your whitewater gear.
Automatic locking carabiners: Personally, I prefer and recommend automatic locking carabiners (double or triple action) because you can't forget to lock them (I very frequently see unlocked screwgate carabiners). The only downside is that they can take some practice to use, so lending automatic locking carabiners to beginners could be problematic, especially where time is of the essence.
Pear-shaped carabiner: Personally, I always use and recommend at least a pear-shaped carabiner to be able to pass over a knot on a zip-line where two ropes are attached together.

My choice: Personally, my favorite choice is the NRS Sliq Triple Lock Carabiner.
Regardless of the type of carabiner, it will be difficult to operate with cold hands.
Interesting video on the subject: "Let's Talk about Carabiners" https://www.youtube.com/watch?v=hKffzn-MNf8&t=2s
Pulleys
Friction : Pulleys are optional, but always preferable to carabiners as they reduce friction and increase the efficiency of the system.
Prusik pulleys: Prusik pulleys exist, but they tend not to work well with our small-diameter rope bags. Therefore, pulleys with a small opening (11 mm rope max) should be preferred, and thin ropes should be avoided.
Size : In most cases, a 1" (25 mm) pulley is sufficient. In some situations involving considerable loads, a 2" (50 mm) pulley might be necessary.
Fixed side plate versus oscillating : A pulley with oscillating plates can be added to the rope from anywhere, whereas with a pulley with a fixed side plate, it must be threaded from one end of the rope.
Pulley type : Those for industrial use are too heavy, and those for sailing are not designed for rescue situations. The best are those made of aluminum, designed for canyoning and mountaineering.
Sealed ball bearing versus unsealed ball bearing:
Water cannot penetrate a sealed ball bearing (and potentially cause corrosion).
Efficiency is greatly optimized with a sealed ball bearing.
My choice : Personally, my favorite choice is the Petzl Mini Prusik. For its availability (MEC), its weight/volume (1"), sealed ball bearing, and reduced opening (11 mm max) which helps reduce prusik brake jamming.
Here is a summary of the video "High Quality Pulleys" where several pulleys were tested for their effectiveness:https://www.youtube.com/watch?v=sBxvEemOUxM
Model | Size | The ratio (the closer you get to 3:1, the more efficient the pulley is). | Maximum rope thickness | Sealed ball bearing? | Weight | Resistance |
Rock Exotica Mini Machined | 1.1 “ | 2.54: 1 | 11 mm | Yes | 83 gr | 30 kN |
Petzl Pare-Prusik Mini (tested with 1 pulley out of 2) | 1 “ | 2.52:1 | 11 mm | Yes | 80 gr | 23 kN |
SMC CRX (tested with 1 pulley out of 2) | 1″ | 2.34: 1 | 13 mm | No | 52 gr | 22 kN |
Rock Exotica Machined | 1.5″ | 2.58: 1 | 13 mm | Yes | 144 gr | 36 kN |
SMC Swifwater | 2” | 2.5:1 | 13 mm | Yes | 170 gr | 34 kn |
Rock Exotica PMP 2.0 (tested with 1 pulley out of 2) | 2″ | 2.66: 1 | 13 mm | Yes | 280 gr | 44 kn |
Petzl rollclip TRIACT-LOCK (tested with 1 out of 2 pulleys) | (carabiner with integrated pulley) | 2.33: 1 | 13 mm | Yes | 115 gr | 20 kN |
Prusik

Lightweight , inexpensive and versatile .
The diameter of the prusik cord should be 2/3 the maximum diameter of your rope (rope bag). For example, for a 9 mm rope, the cord should be 6 mm.
Length : Generally, cords of 4 to 6 feet/1.2 to 1.8 meters are used (if it's not sewn). Personally, the shorter, the better (insert joke here).
Knot : Use the double fisherman's knot or a figure-eight knot to tie the cords (if it is not sewn).
CSRQ (Quebec River Safety Consortium) : The CSRQ recommends 2-meter lengths of cord with a 6 mm diameter.
Modern Prusik : Sewn prusiks have long been used in climbing, but it seems the whitewater world is lagging behind. I've never understood why they keep pushing cords that require a knot for whitewater rescue. They're time-consuming, bulky, more complicated, and above all, less durable (at least 30% less strong). The only answer I've ever received is that they cost more and paddlers aren't willing to pay for them… with a $2000 kit on their backs… $25 prusiks… anyway.
Versatility : a prusik can also be attached to a paddle and used as a tool to raise a rope above the river or to sink a rope below the water for bottom clearance techniques.
Other considerations
The smaller the diameter of the cord, the more it grips, but the less resistant it is.
The minimum diameter is 5 mm, as a 4 mm cord can cut the rope. If you can't follow the 2/3 rule because your rope's diameter is too small, you can make more turns when tying your prusik knot to increase friction.
Prusiks are generally the weak point in SAMs, followed by anchors on boats, so it is worth investing in good prusiks.
Keep the prusik cords knot-free to avoid weakening the cord prematurely.
Normally, prusik knots will start to slip (around 5-6 kN) before breaking, so this is something to watch for when pulling on a rope. A slipping prusik isn't a problem, and you can continue to increase the tension on it, but the friction will melt your rope (and therefore destroy it).
Mechanical locking devices (Tibloc or Nano Traxion) are not suitable for the type of rope used in rivers (floating polypropylene sheath). They could quickly damage your rope.
Interesting video on the subject: "Prusiks with Mark" https://www.youtube.com/watch?v=4GaZgJ-RLXA
Personally, my favorite choice is the Sterling HollowBlock2 6.8 mm.
Sterling Hollow Block2 | Sterling Auto Block | Standard cord: Mammut static nylon cord | |
Diameter | 6.8 mm | 6 mm | 6 mm |
Length | 13.5 or 19 | 13.5 “ | |
Resistance | 14 kN (3147 lb) | 12.5 kN (2810 lb) | 7.49 kN (1686 lb) |
Note | Its unique construction allows it to grip ropes of 7 mm and above. | If we subtract 30% (minimum) of the resistance due to the double fisherman's knot, the resistance will be closer to 5.24 kN (1177 lb). Considering that a prusik knot starts to slip around 5-6 kN, we're okay, but we're pushing the limits and not respecting the 50% margin rule. |
Strap (Flip line, Guide sling)
Versatile : This is a multi-purpose tool used to create strong anchors, to help right a boat, as a mini throwing rope, a quick anchor for your boat, etc. That's why I always carry one in my PFD.
Knot : The strap knot is generally used to tie the straps.
CSRQ: The CSRQ recommends a tubular webbing 5 m long and 1” (25 mm) wide, made of nylon.
Modern sling (Rabbit runner, the future!): Consists of a UHMWPE sling (trade name like dyneema or spectra) with a loop sewn on each side large enough for a carabiner, popular in the world of climbing and sailing.
A compact and lightweight alternative to tubular nylon straps
Does not absorb water
Fleet
Less friction (so if you're doing a simple SAM without a pulley, it will slide much better than a nylon strap)
Superior durability
10 -14 mm (versus 25 mm old school nylon webbing)
High resistance (superior to steel, UV resistant)
Low elasticity
No need to tie a knot (therefore, it retains 100% of its strength)
Negative point: sensitive to cuts and low melting point (vulnerable to high temperatures).
It's no coincidence that leading companies like Palm now offer this type of strap.
Interesting video on the subject: Modern Flip Lines and the Clean Line Principle https://www.youtube.com/watch?v=Qz_ZcNbuUH4&t=60s
Personally, my preferred choice is: Titan anchor slings/rabbit runners 13 mm
Titan anchor slings/rabbit runners 13 mm | Palm Cobra sling 10 mm (designed for whitewater) | River hardware 14 mm (designed for whitewater) | |
Length | 12 feet | 4 m (13.12 feet) | 12 feet |
Resistance | 3500 lb (15.56 Kn). | 10 kn | |
Weight | 67 gr | ||
Material | Dyneema | UHMWPE | UHMWPE |
Rope
We could talk about this for days, so it will be the subject of a future post. In the meantime, here are a few key points:
The heart : The rope is the heart of your SAM.
Elasticity : Bag ropes are generally not very elastic (unlike a climbing rope designed to cushion a fall).
Buoyancy : Bag ropes must float (outer sheath made of polypropylene).
Negative points : This material has some disadvantages such as being less strong than other types of rope (climbing) and having a low melting point (melts easily with friction) and wears out more easily.
Materials : Kevlar or Spectra core ropes are much stronger, but still have the disadvantage of having a polypropylene sheath with its low melting point.
CSRQ : The CSRQ recommends a rope bag of at least 15 m, diameter of 8 mm with 2500 pounds of resistance for TR1 training and a rope bag of at least 20 m, diameter of 9.5 mm for TR2 training.
Personally , I use an 18m rope bag, 8mm diameter with 3000lb resistance (WWTC Rescue Rope CLASSIC).

Security
A SAM without safety measures can put the rescuer(s) in danger.
Recovering equipment is the last priority and should never unnecessarily endanger rescuers.
The dangers
The risk of getting stuck (entangled) caused by a slack rope in the river.
A SAM has the potential to generate several thousand pounds of pressure. A SAM breaking can mean pieces of metal flying through the air like rifle bullets with a lot of force (I also like the analogy of a very powerful rock-puller).
For these reasons, it is important to respect the various safety principles explained in this text:
Redirection
Shock absorber
Quick release system
Multiple anchor points
Angle of stress
Direction of fire
ETC.
Other considerations
Always pull upstream of the SAM. That way, if the system breaks and gets carried away by the river, you're less likely to get pulled into the water by the rope.
If an adjustment of the prusik is unavoidable (slide the prusik upwards so that it does not get stuck in the pulley), always keep your back to the system in case it breaks.
Never tie yourself or make dead turns with the rope on you.
Always keep a knife handy.
Each person in the hot zone (10 feet from the river) must wear their PPE (PFD, helmet, knife, closed shoes to avoid foot injuries, etc.).
Check that no one is putting themselves in danger.
The different SAMs
Before pulling a boat with a rope, have you tried to:
To use leverage.
Change the shape of the boat (e.g., deflate one side of the boat).
Try moving the boat up and down.
If none of that works, then we can start playing with strings.
The simplest solution for pulling a rope with more force is to use more pullers. The second simplest option is to create a vector. If that still doesn't work, then a more complex SAM (Single Action Method) can be attempted.
The optimal firing angle (in general, as each situation is different): approximately 45 degrees upstream (towards the top of the river).

Systems with a ratio greater than 12:1 begin to show diminishing returns due to friction and their increased complexity.
The different elements in a SAM:
Brake/progress sensor. https://www.youtube.com/watch?v=w9C20rytfVQ&t=23s
A SAM (Swimming Attenuator) requires a brake to avoid tug-of-war with the river. The progress made with the SAM must be captured before the current pushes the boat back to its starting position. The prusik is usually the tool used for braking.
When adjusting the brake, make sure there are no loose clothes, hair, or fingers that could get into the pulley.

Redirection
Redirect the system away from the impact zone. A redirection (pulley or carabiner) reduces the system's effectiveness but increases safety. Redirection is the new standard. Change the firing direction by 90 degrees to keep rescuers out of the line of fire if the SAM breaks.

Shock absorber
Add a weight (shock absorber) to the system to reduce its flight distance in case of breakage. Ideally, a PFD (personal flotation device), but a water bottle, rope bag, etc., will also work. Attach it directly to a prusik loop, as close as possible to the weakest point of the SAM (Simulated Airborne Module). Choosing a floating object above water is ideal to avoid creating an additional risk of entanglement. Note that a shock absorber is not a substitute for redirection.

Quick release system
A SAM can create several thousand pounds of pressure and it is common practice to go and hold the brake manually, while other rescuers put the system under tension, to disengage the brake/reset the system.
Incorporating a quick release system on the anchor avoids putting oneself in the most dangerous area by allowing the tension on the system to be released without needing to manually manipulate the brake.


1:1 (aka the tug-of-war game or the ten Boy Scout method)
Attach the rope to an anchor (e.g., D-ring), and pull using your arm strength.
Play around with the directions in which you pull and try different anchors on the boat.
Provides no mechanical advantage.

1:1 with vector
Stretch a rope between two anchors (typically the shore and a boat). Connect and pull on a second rope at the center of the first rope, ideally at a 90-degree angle to it. This will create a force equivalent to a 3:1 SAM (Sudden Attenuation Method).
A simple and elegant solution to try before implementing a more complex system.
Connect with a carabiner or a prusik.
Try different angles.
The tighter the first string, the more efficient the system will be.
The greater the angle of the shot (relative to the initial 90 degrees), the more the effectiveness is lost. The advantage is completely lost at angles of 45 degrees and above.
An interesting video about vectors: https://www.youtube.com/watch?v=NIhSVxrQDyQ&t=18s


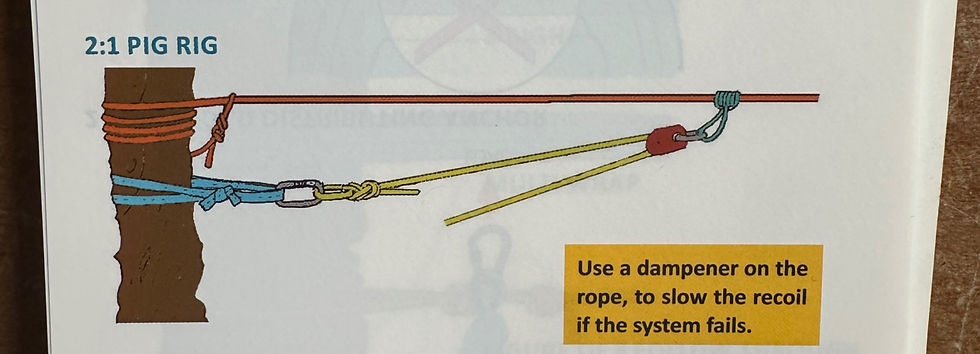
2:1


2:1 (Pig-rig)
Pig-rig systems are modified versions of SAMs (Seasonal Anchor Methods). They are essentially SAMs attached to a main line. They are ideal when the distance between the shore and the boat is greater and the system needs to be reset multiple times. However, pig-rig systems require more equipment (a minimum of two ropes).
3:1 (Z-drag, Z-rig)
The most popular SAM, who will be able to get you out of most situations.
This is the system with which paddlers are most familiar.

4:1

4:1 (Pig-rig)
25% more efficient than the 3:1
Best used when the boat is far from the shore
Interesting video on the subject:https://www.youtube.com/watch?v=S1tR1FHIPrE

5:1

6:1


9:1 compound
Be careful, with that much force you could literally tear your boat in two.


Theoretical versus actual advantage
The mechanical advantage is theoretical. Each pulley reduces the mechanical advantage by about 10%. In theory, in a 3:1 system, pulling 1 unit of force generates 3 units of force on the other side of the system (on the boat). With pulleys, the ratio is closer to 2.5:1 (due to friction). Only with carabiners does it drop to 2:1 (even more friction).
In "Testing Theoretical vs Actual Mechanical Advantage for Haul Systems," Zac tested different systems to determine the actual advantage. (https://www.youtube.com/watch?v=55xbCd2VTk0 )
Theoretical mechanical advantage | Input (kN) | Output (kN) | Real mechanical advantage |
1:1 | 0.82 | 0.84 | 1.02:1 |
3:1 | 0.75 | 1.88 | 2.51:1 |
3:1 with a redirect | 0.84 | 1.88 | 2.23:1 |
3:1 vector | 0.74 | 1.64 | 2.21:1 |
5:1 | 0.68 | 2.22 | 3.26:1 |
9:1 | 0.34 | 1.88 | 5.53:1 |
Conclusion: the more complex the system, the less efficient it is.
Improvised system
Tonsmiere tug
— An ingenious system invented by two veteran paddlers who found themselves with a choice: untie their boat or walk 160 km. The original model used vice grips!
— It basically consists of using an oar as a powerful lever. The longer the lever, the more effective it is.
— For example, with a 10-foot oar, the advantage may be as great as 25:1.

Passing a knot
— If your rope isn't long enough, you might have to join two ropes (so, probably tie a knot in your system). With a little creativity, it's not an impossible problem.


Marine anchor system
— An ingenious technique created by an Alaskan guide. He uses the force of the river on one boat to free another.
— If the current on the anchored canoe is equal to or greater than the current holding the stuck boat, the boat should free itself.

The paddler's winch
— This is a capstan-type winch, used since antiquity. This technique creates a theoretical mechanical advantage of 30:1.

Knots

There are entire books on knots, so let's keep this simple. Here are a few key points:
It is not uncommon for paddlers to go an entire season without needing to tie any knots.
A good practice is to practice knots underwater, without looking. This is probably how you'll need to tie some of the knots for anchoring your boat.
Remember that each knot reduces breaking strength, so avoid unnecessary knots. For example, a figure-eight knot will reduce the rope's strength by about 30%. This should be taken into account when calculating the strength of your system.
Different knots for different situations (direction of fire, ease of untying, etc.).
Knots
Can exist independently of an object, unlike a hitch.
Figure-eight knot (single, double, spun): The figure-eight knot family can meet most situations and are the most used knots in river rescue.
Bowline knot
Butterfly
Double fisherman's knot: For making prusik cords or joining 2 ropes together.
Strap knot (cow knot, water knots)
Hitch (to attach a rope to an object)
Prusik: This knot grips when under tension, and slips when released.
Capstan (clove hitch)
Half-cabestan (munter hitch, Italian hitch): Good as a progress sensor or for improvising rappelling.
Lark's head knot (girth hitch)
Anchorages
When building a SAM, this is often where the problems begin…
Creating an anchor can be as simple as attaching a rope around an object that will not move.
Anything solid can serve as an anchor, typically trees and rocks.
General ideas
Choose the biggest and healthiest tree. A simple idea regarding trees is "Five and Alive" — 5 inches in diameter and alive.
I have already seen paddlers carrying mechanical cams (used in climbing) with them to be able to make anchors where anchoring possibilities are limited.
Wedging a knot in a crevice can also be an anchoring idea.
If necessary, the rope/strap can be protected with clothing, life jackets or other materials.
A static sling (tubular nylon or UHMWPE sling) is generally the material used: more resistant to abrasion, more durable, slips well between 2 rocks and does not roll on itself (stays in place).
It's a good habit to double up on an anchor point when possible.
The CSRQ recommends a tubular webbing 5 m long and 1” (25 mm) wide, made of nylon.
Personally, my preferred choice for anchors is: Titan anchor slings/rabbit runners 13 mm in Dynema.
Certain principles apply equally to anchoring to the load and to anchoring to the bank.
Angle of stress
Load distribution between different anchors can be achieved using a sling or rope. The angle between the strands is important; it should be between 45 and 90 degrees. As soon as the angle between the strands exceeds 120 degrees, the anchors are supporting a force greater than the load itself.


Single anchoring versus multiple anchoring
For a light load, a single anchor may suffice. However, you're putting all your eggs in one basket! Use this method only if the anchor is 100% reliable. For a heavy load or with weak anchors, it might be necessary to distribute the load across several anchors to double the protection if one of them slips or breaks.
Balanced multiple anchoring (multidirectional) versus fixed anchoring (unidirectional)
A multiple anchor can be set up in a multidirectional (balanced) or unidirectional (fixed) way. In climbing, fixed multiple anchors are more common because the load does not change direction. In river climbing, the load can be dynamic and can quickly change direction if a boat is pulled loose and swings towards the bank; therefore, the balanced option is preferable.


The magic X
For a balanced multiple anchor, a useful trick to remember is the magic X. By moving the carabiner from side to side, you can see that the anchor adjusts and balances itself (distributing the load evenly between the two anchors), and the twist ensures that the anchor is doubled. One of the anchors could fail without any loss of load.

The acronym SERENA is an interesting acronym for creating anchor text.
S —Solid Ex. Choose a tree with a minimum diameter of 5 inches. Living tree. Protect sharp corners on rock, etc.
E —Equally Distribute the load equally across the different anchors.
RE - Redundant Distribute the load over at least 2 anchors, in case one of the anchors breaks.
N —No extension make a flat knot on the strap that connects the anchors to avoid a shock on the remaining anchor if one of the anchors fails.
A —Angle respect the 90-degree maximum rule wherever 2 straps connect.
The acronym IDEAS is an interesting acronym for the basic principles of a good anchoring system. It is used by the CSRQ.
I — Integrity: Level of integrity, can it support the load? Materials, wood, trees
tree assessment, soil type, strap, rope, cord, anchoring with
Camming devices, anchors lower down vs. higher up. Single anchor vs. double anchor
balance
D — Direction: Firing angle (45 degrees upstream)? Distribution of
directions VS unidirectional.
E —Balanced: Are the movements of the loads equalized and distributed?
A —Angle of stress
S- Safe: Is it safe? Should we double-check, redirect, or take cover? Usage
Straps without strangulation, knots clear of the anchor point, avoid knots
tension (twisted), avoid friction points.
Personally, I am not a fan of acronyms, because nobody remembers them.
Anchoring on the riverbank
With a strap (nylon or UHMWPE strap)
Simple
Requires knowledge of the strap knot
Easy to remember
Allows for anchoring on a tree/rock of large diameter

Basket (basketball)
Stronger than simple anchoring

Basket with a twist
Allows the anchor to remain in place when the load is intermittent.

Double balanced
If you have any doubt, go for multiple anchors.
Distributes the load equally over 2 anchors (multiple anchor).
Maximum 90 degrees: the greater the angle, the greater the load on each anchor.
In rivers, a balanced anchor is preferred to a fixed anchor (the load can be dynamic).
Lark's head
Simple and quick.
Ideal with a pre-tied strap.
Avoid slipping on the anchor.
Often overlooked by instructors, because the anchor must be properly oriented, otherwise the resistance will be greatly reduced.

Simple anchoring or basket anchoring tends to slip when the load is intermittent.
Anchoring on the bank without equipment (only the rope/rope bag)
Knotless knot
The best option to avoid reducing rope strength when rope length isn't an issue. Easier to untie than a spun figure-eight knot.
Make 3-4 turns around a tree/rock and attach the dead end to the main line with a carabiner/figure eight.
Allows the rope to retain all its strength compared to other anchors that require a knot.
A major advantage is being able to release tension on a system (even when under high tension) by simply unwinding the rope calmly.

8 spun

Anchoring on the boat
We prioritize approaching the boat from downstream to avoid the same danger that encircled your boat.
Favor a balanced multiple anchor point, when possible (our SAM is stronger than anchor points like D-rings and handles).
Multiple anchoring with a strap (with or without carabiners).
''Two Point Self Equalizing Anchors on Rafts'': https://www.youtube.com/watch?v=BD3nHoEHNFo
''Three Point Self Equalizing Anchors for Rafting'': https://www.youtube.com/watch?v=cscUGDJEymc&t=250s

2. Multiple anchoring without strap (with two or three anchors).
''S tatic Line Two Point Self-Equalizing Anchor'': https://www.youtube.com/watch?v=EDoYe-gm5HY


Optimal anchoring depending on the type of vessel
Raft: perimeter tube, oar frame, seat, D-ring (multiple)

Canoe: the complete hull, crossbar, seat


Kayak: the complete hull, safety handle, the seat

Vertical rescue versus horizontal rescue
In horizontal rescue operations, the threshold of acceptability is higher than in vertical rescue operations (climbing, mountaineering), particularly for anchors.
Vertical rescue is primarily about saving people, with a risk to life at stake.
Horizontal rescue is mainly used to fire at equipment rather than people, so the consequences are less significant.
How much weight will I need to pull to get my boat out?
We always talk about the resistance strength of our system and equipment, but in reality, we have very little information about the load we'll have to pull when a boat (canoe, kayak, raft, etc.) gets stuck. That's the missing piece of the puzzle.
A designated driver can be used for everything from locking your bike in your garage to securing a human 40 feet in the air during a circus performance. Where do we stand in all of this, given the situations we encounter on the river?
Retrieving a kayak versus retrieving a 16-foot raft filled with expedition gear will be completely different situations.
It's great to have a rope that can hold 10,000 pounds, but if the situation requires 300 lbs, you'll be carrying way too much equipment unnecessarily and ultimately it will do you more harm than good.
Here's a lead:
The most interesting source I found is this video from Rafting Magazine (in collaboration with hownot2.com ).
They tied (stuck on a rock) a 10-foot raft and used a dynamometer (device to measure the pulling force on a rope) to measure the force needed to untie (unstick) the raft with a scenario as close to reality as possible.
They used two dynamometers. The first to measure the total force on the system (at the anchor point) and a second dynamometer to test the force applied at the output of the system.
Here are the results of their tests:
The force on the system (in kilonewtons) | The force at the system's output (in kilonewtons) | Advantage of the system | Success ? |
1.57 KN (352.95 lbs) | 0.44 kN (98.91 lb). Per 1 rescuer | By pulling on the rope with a force of 99 lb, it generates a force of 353 lb, which is 3.56 times the initial force, or 3.56 : 1. | No. One rescuer with a SAM 3:1 was not enough to move the raft. |
2.46 kN (553 lb) | 0.78 kN (175.35 lbs). By two rescuers | By pulling on the rope with a force of 175 lb, they generate a force of 553 lb, or 3.16:1. | Yes. Two rescuers managed to apply enough force to move the raft. |
3.26 KN: Maximum force applied to the system by the force of the water.
1.7 kN maximum force applied by two rescuers to pull on the rope
They could have created more force by pulling on the rope with several rescuers (respecting the rule of 12).
How much force can be applied to a D-ring (raft) before it breaks?
In the same video, they tested a welded D-ring (stronger than a glued D-ring).
Definition of a D-Ring: a metal ring in the shape of a "D" used as an anchor point on a raft.
They applied 4.7 KN of force before the D-ring tore (shear tension: worst-case scenario).
They applied 6.05 kN of force before the D-ring tore (perpendicular tension: optimal). A D-ring is therefore 26% stronger under perpendicular tension compared to shear tension.
Conclusion #1 : In theory, regardless of the angle of fire, a D-ring is stronger than the maximum force required to pull a snagged raft out (for a 10-foot raft).
Conclusion #2 : In theory, with 3 people shooting at a 3:1 SAM it would be possible to create enough force to tear off a D-ring.
Gaps in the whitewater industry
It's an industry standard in many sports (like climbing) to conduct all possible tests to determine the limits of equipment. In our sport, very few tests are carried out, and even fewer are made public (probably to avoid impacting sales if the test results are inferior to those of a competitor).
In climbing (and other sports), equipment pieces are all classified (measuring resistance and load capacity). This allows manufacturers to differentiate themselves by saying, "Hey, look, I have the strongest equipment." In whitewater sports, there's clearly a gap to fill.
When some try to take the initiative (like the people at Rafting Magazine) to conduct tests, many manufacturers refuse to provide the necessary equipment. It's difficult to conduct tests ourselves because it involves putting our expensive equipment to the test.
The 12 rule
An interesting theory explained by Zac in this video:https://www.youtube.com/watch?v=aa3a6W2fehU
This is a good general rule to remember to respect the (average) breaking strength of a SAM.
The rule : When multiplying the number of people who benefit from the mechanical advantage, it must not exceed 12.
Example :
Vector (equivalent to a 3:1), the maximum to draw is 4 people (4 people x 3 = 12).
3:1, the maximum for shooting is 4 people (4 people x 3 = 12).
4: 1, 3 people maximum (4 people x 3 = 12).
5: 1, 2 people maximum (2 people x 5 = 10).
9 : 1, 1 person maximum (1 person x 9 = 9).
If we exceed the rule of 12, our SAM risks breaking and could potentially injure someone.
Explanation behind the rule
Shooter's strength
A general rule is that each person can pull about 0.5 kN to 1 kN or about 50% of their body weight (or more).
Another source (Peter Reithmaier, an Austrian engineer/paddler) discovered that the pulling force a person could exert on a rope depends not so much on their strength as on their weight and how well they were able to hold the rope.
— Holding the rope in your hands: approximately 60% of your body weight.
— Pass the rope over the shoulder or around the body: approximately 120% of one's weight.
— Reithmaier suggests making a series of directional loops (8 directional) on the rope to increase strength.
Factors that will influence the force that each person can pull: the thickness of the rope, whether the puller wears gloves, the puller's weight, whether the puller uses good technique, etc.
Average breaking strength of equipment
Rope: 10 - 29 kn
Carabiner: 20-29 kn
Prusik: 8-12 kn
Sling: 18-20 kN
D-Ring: 4 - 6 kN individually, but generally we will take 2 or 3 d-rings to make an anchor.
Kayak handle: ??
Canoe handle: ??
So, let's say that 4 people pull on average 1 kN (optimal) each on a 3:1 system, the maximum (theoretical) force on the load would therefore be 12 kN.
In theory, applying a force of 12 kN respects the average breaking strength of the equipment composing a SAM.
The T-count method
Finally, a method that helped me understand how to calculate and explain a SAM.
This is a method for analyzing and understanding the forces in a pulley and anchor system, often used in climbing and rescue.
Let's try the method on a Z-drag to confirm that it's a 3:1

Let's start with the strand that we pull and assign it a traction worth one unit of tension (1T).
Follow the rope with your finger to the first pulley. 1T of force enters the pulley and 1T of force exits the pulley. Since each strand of rope contains 1T, the tension on the pulley (and the prusik) is 2T (same principle as multiple anchors).

Let's continue following the rope coming out of the pulley with our finger towards the anchor. 1T goes into the anchor pulley and 1T comes out of the anchor pulley. As with the first pulley, this pulley accumulates 2T of force (on the anchor), and the rope strand coming out of the pulley still only has 1T of force.
Let's continue following the strand coming out of the anchor pulley to the prusik. The prusik has accumulated 2T and, when combined with the 1T of the rope, we get a total of 3T. A 3:1 system.
Turning line (roll over line)
Two forces act on any stuck boat. One is the force of the current pushing the boat against the obstruction, and the other is the weight of the water trapped inside. Since water is heavy (8.33 pounds per gallon/62.4 pounds per cubic foot; one kilogram per liter) and a submerged boat can trap several hundred gallons, this can represent a considerable weight. It therefore makes sense to pump out as much water as possible during the operation.
The technique involves installing an additional rope that serves a purpose other than a SAM (although a SAM can also be performed on it). It is used to right a capsized boat to drain water during the operation.
As the maneuver progresses, an air pocket forms, creating an imbalance of force between the boat and the river, which ultimately helps us to pull our boat out by working with the river.


Steve Thomas : An ingenious technique that allows you to tie knots above the water and rotate them into position is called the Steve Thomas technique. It works with canoes and rafts.


Taco Method
The idea is to use one part of the boat to pull on the other part, to evacuate water during extraction.
Perform a z-drag between two balanced multiple anchors at each end of the boat. The system is then connected to a SAM from the shore.


Diagonal under tension (zip-line)
Now that you know how to make a SAM, you practically know how to make a zip-line!
This is a technique used to cross people or equipment using the river current. The rope must be taut because a slack rope could cause the load to get stuck in the middle of the river. The steeper the angle (45 to 60 degrees) relative to the current, the more effective the zipline. Avoid an angle of less than 45 degrees. A life jacket with a quick-release belt is ideal for crossing diagonally under tension, as it allows you to free your hands (for example, to carry an injured person). Otherwise, a prusik knot is generally used (hold the knot for a better grip and avoid placing your entire hand through to prevent getting stuck).
This technique is practiced as part of TR2 training.


The shooting sequence
For good risk management.
When the system is ready and has been double-checked, the leader initiates the sequence:
Prepare to shoot.
Is anyone not ready to shoot?
OK, 1-2-3 —shoot!
Pause, we wait. Wait 5 seconds after the last shot before adjusting the brake.
Adjust the brake if necessary (always with your back to the system).
Reset the system if necessary: as the pull progresses, the prusik closest to the boat will be pulled towards the anchor on the shore. You may need to reposition (slide) the prusik near the boat for a second pulling sequence.
Personal conclusion
All the texts in the world cannot replace real practical training, with simulations, in the field.
You've probably already invested a small fortune in your paddling equipment, why skimp on your safety gear?
It's 2025, equip yourself with modern equipment: UHMWPE webbing, self-locking carabiner, sewn prusik, pulley with sealed ball bearing.
It's easy to do a SAM, but have you taken all the considerations for your safety and that of other rescuers? Redirection, shock absorber, quick release system, working upstream, working with your back to the system when in the hot zone, respecting the rule of 12, multiple anchors, etc.
Prusik management: It doesn't make sense for someone to have to manage the prusik (brake/progress sensor), sliding it away from the pulley while the others are pulling on the rope. Have you taken all the necessary steps to avoid this situation? Pulley selection (11 mm max), prusik and rope thickness, quick-release system, etc.
Sources
Ostis, Nate. NOLS River Rescue Guide . Stackpole Books, 2015.
Peled, Danny. Pocket guide to whitewater rescue . Boreal River Rescue, 2014.
Schaeffer, Sue. Z-Drag and Related Boat Retrieval Techniques . 3rd ed., Wave High, 2002.
Ray, Slim. Swiftwater Rescue Field Guide . Revised ed., Floodfighters Series, 2013.
Canoe Kayak Quebec, Eau Vive Quebec, and Lifesaving Society. Whitewater Rescue – River Rescue Technician (TR II) . Canoe Kayak Quebec, Whitewater Quebec, Lifesaving Society, PDF file.
McGinnis, William. The Guide's Guide Augmented: Reflections on Guiding Professional River Trips . Whitewater Travels, 2005.
Mehl, Luc. The Packraft Handbook: An Instructional Guide for the Curious . Illustrated by Sarah K. Glaser, Things to Luc at LLC, 2021.
Polsby, Abigail, and Julie Munger. River Rescue and Safety Field Guide . Sierra Rescue International, 2017.
Bechdel, Les, and Slim Ray. River Rescue: A Manual for Whitewater Safety . 4th ed., CFS Press, 2009.
Bennett, Jeff. The Essential Whitewater Kayaker: A Complete Course . Ragged Mountain Press, 1999.
Ferrero, Franco. White Water Safety and Rescue . 2nd ed., Pesda Press, 2012.
Alex


Comments